- a REST API
- A Database
Showing posts with label NodeJS. Show all posts
Showing posts with label NodeJS. Show all posts
Tuesday, November 29, 2016
Home Automation (4): API and DB
I have decided to add to my Home Automation (Concept System) two important pieces:

Saturday, November 12, 2016
Home Automation (1): the beauty of Visual Programming.
I have written several posts on Node-RED in my blog.
Node-RED is a Visual Programming Environment, based on NodeJS, that can be used to develop flows, to integrate for example an MQTT broker, and to easily manage, transform messages coming from devices. Perfect for IoT.
The nice thing about NodeRED is that it has a small memory footprint (it is based on NodeJS) and therefore it runs perfectly on a RPI 3 with only 1 GB of memory. The kind of device that you can adopt for a local gateway.
On this subject, for example, OpenHAB, that is Java based, takes much more memory.
Recently I have discovered that there are some modules for NodeRED that you can easily add and they give you the ability to develop flows with a resulting User Interface (UI).
The widgets that you can employ are the one that you see in one of my previous blog’s post: Gauge, Charts.
Is it difficult to develop some flows, starting from MQTT messages, displaying readings from sensors on a responsive and nice UI? No, a matter of hours.
Here you see a snapshot of the flows I have developed:

And here you see one tab of the resulting UI:
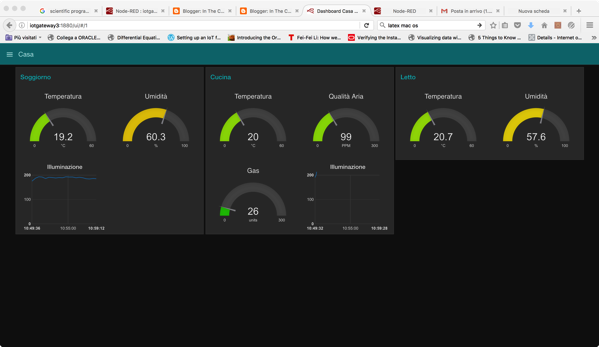
Readings (temperature, humidity, luminosity, air quality, gas) are coming from: Arduino MKR1000, Intel Edison, Fishino, connected through a WIFI network.
Node-RED is a Visual Programming Environment, based on NodeJS, that can be used to develop flows, to integrate for example an MQTT broker, and to easily manage, transform messages coming from devices. Perfect for IoT.
The nice thing about NodeRED is that it has a small memory footprint (it is based on NodeJS) and therefore it runs perfectly on a RPI 3 with only 1 GB of memory. The kind of device that you can adopt for a local gateway.
On this subject, for example, OpenHAB, that is Java based, takes much more memory.
Recently I have discovered that there are some modules for NodeRED that you can easily add and they give you the ability to develop flows with a resulting User Interface (UI).
The widgets that you can employ are the one that you see in one of my previous blog’s post: Gauge, Charts.
Is it difficult to develop some flows, starting from MQTT messages, displaying readings from sensors on a responsive and nice UI? No, a matter of hours.
Here you see a snapshot of the flows I have developed:
And here you see one tab of the resulting UI:
Readings (temperature, humidity, luminosity, air quality, gas) are coming from: Arduino MKR1000, Intel Edison, Fishino, connected through a WIFI network.
Tuesday, August 30, 2016
Now a simple iBeacon
As I wrote in the previous blog post, iBeacon are things born in Apple’s mind.
A simple way, based on BLE, to add Location Awareness to your things and Applications.
An iBeacon is a small thing, with a chip supporting BLE, powered by a “cell coin” battery”, that does only one thing: periodically transmits an advertising packet that contains some information:
- UUID, major and minor number; These three values uniquely identify the iBeacon (for example they represent: the company, the room and something inside the room);
- RSSI: Received Signal Strength Indicator; A value that indicate what should be the signal strength received by a detector at 1m distance
A device capable of BLE communication can scan the frequencies and detect the near presence of the iBeacon; For example you can use an iPhone, with an App like Locate (by Radius Network), to detect iBeacon and therefore provide you with information of value when you’re near the Thing the iBeacon is attached to.
Imagine: you’re walking along a Museum and you want to see on the screen of your Smartphone information relevant to the portrait you’re looking at.
You can easily buy today iBeacons for a small amount of money, for example from Amazon.
Now, as I told you in the previous post, there are some NodeJS modules that enable you to write application based on BLE and iBeacon.
With the BLENO module you can easily create an iBeacon. Try it on Linux or Mac OS, obviously with an HW supporting BLE:
//
// this code simulate an iBeacon in NodeJS
//
var bleno = require('bleno');
// you can change it
var uuid = 'e2c56db5dffb48d2b060d0f5a71096e0';
var major =0; // 0x0000 - 0xffff
var minor =0xffff; // 0x0000 - 0xffff
var measuredPower = -57;
bleno.on ('stateChange', function (state)
{
console.log ( 'State change:' + state);
if (state === 'poweredOn')
{
// What I want to advertise
bleno.startAdvertisingIBeacon(uuid, major, minor, measuredPower);
isAdvertising = true;
} else
{
bleno.stopAdvertising ();
isAdvertising = false;
}
});
As we have pointed out, uuid, major and minor number should identify the iBeacon.
Another useful parameter is measuredPower. This parameter maps to the RSSI. It is an estimation, provided by the iBeacon vendor, of the RSSI that your detector (for example a smartphone) should measure at 1m of distance. Since the RSSI is approximately a linear function of the distance, your detector can compare the RSSI observed with the value provided by the iBeacon (measuredPower) and therefore calculate approximately the distance from the iBeacon.
It is not a very accurate estimate. The reason is that your iBeacon is positioned in an environment that can influence the actual BLE signal power observed. The estimate is more accurate as the distance is lower. But it is a useful indicator for proximity.
Bluetooth and Bluetooth Low Energy
Introduction.
In this blog post I want to highlight the main features of Bluetooth Low Energy and to show how it can be used on Intel Edison as a communication protocol.
Bluetooth is born, now almost twenty years ago, as a wireless communication technology, short-range: a technology to implement at low cost a Wireless Personal Area Network (WPAN).
Historically, the first and principal use of Bluetooth was voice and audio streaming, for example from a mobile phone or Smartphone, to a headset or a wireless loudspeaker. Today, all the cars provide connectivity from a smartphone or other devices to the speaker using Bluetooth.
In addition, many runner, like me, use Bluetooth wireless headset to listen to music stored on their Smartphone, when they run.
But the advent of Bluetooth Low-Energy (BLE) or Bluetooth Smart has broadened the range of possible solutions and enabled realization of low-power wireless connectivity between devices with limited resources (e.g. powered by a tiny "cell-coin " battery), fitted with sensors (heart rate, temperature) and a central device that receives, processes and displays data.
The center device often is a Smartphone or better today a Smart-watch.
In fact, today the BLE technology is the simplest wireless communication technology short-range that can be used to communicate with a smartphone (iOS, Android, Windows Phone).
BLE is a communication protocol that rightfully can be considered very important in the context of the Internet of Things. For this reason, it is increasingly supported, for example in boards used by so-called Makers: we find an out-of-the-box support for Intel Edison and even in the latest version of the Raspberry PI, version 3.
Main use cases for BLE.
BLE is a low-power wireless communication technology (low power).
It has a very low energy consumption compared to the WI-FI. In fact it is possible to fabricate devices (see the so-called iBeacons) that by using a "coin-cell battery" broadcast for years without having to change the battery.
It has a limited communication range (tens of meters) and the amount of data to be transmitted per second can not be high (say of the order of tens of bytes per second).
There are many scenarios in which you can think of adopting BLE.
Think of the case of use of the "Connected Car": we want to collect a lot of data, produced by the various car components in real-time, allowing you to analyze the behavior, for example to predict the need for maintenance (Predictive Maintenance).
In this case an effective topology provides a " field gateway", a central device that connects via 4G network (for example) with an IoT Cloud Service, and a series of "resource constrained" devices acquiring data from sensors and communicating with the gateway via BLE. The gateway performs local analysis of the data, aggregates the individual readings and sends messages to the Cloud Service.
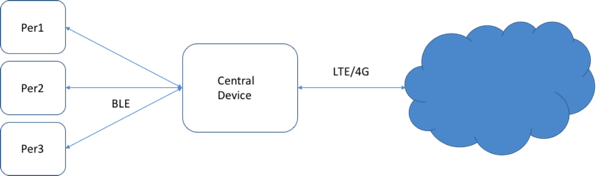
Another use case is in medical applications. You may think to measure vital signs such as heart rate (Heart Rate, HR) using a device with a sensor that transmits via BLE to a central monitoring.
iBeacon.
An iBeacon is a small low-power device, battery powered (e.g. CR2032), , which transmits periodically, every fraction of a second, a message that allows a detector (eg: an App on iPhone) to identify its presence and read the distance.
The specification of iBeacons was defined by Apple. An iBeacon transmits using BLE, using the advertising messages, with a custom usage of the optional data area advertising packet.
Each message contains a UUID, a Major and a Minor number, which allow you to uniquely distinguish the Beacon.
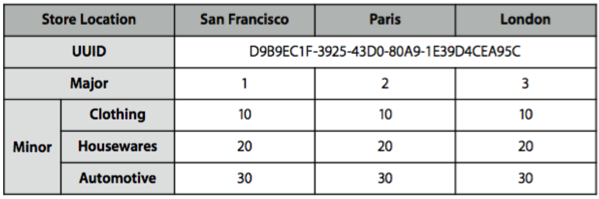
They are typically used as proximity indicators: to indicate that the detector is close to an iBeacon, and somehow identify the environment where it is located (example: I enter into a shop XXX and I’m in the section YYY of the shop).
Another example: we can assign a distinct beacon to each member of our family and place a detector at the entrance of the House, near the door. Thus, as soon as a person of the family enters in the House the Beacon assigned is detected and person recognized.
The main benefit from Beacons comes from their simplicity. The power consumption is extremely low (in the order of micro-amperes) and then the battery can last a year without having to be replaced.
A very well-made guide that explains how the technology of iBeacon works and how it can be used to add "Indoor Location Awareness" to applications is available on the Apple Developer website:
https://developer.apple.com/ibeacon/Getting-Started-with-iBeacon.pdf
It is interesting that even an Apple iPhone can behave as an iBeacon. Activating an application on your iPhone, you can enable its recognition as soon as you get into an environment that "reveals" the close iBeacon.
Standard.
BLE from the point of view of standardization is a "lightweight" subset of the Bluetooth Core 4.0 specification.
For the specifications, see, for example, the site:
According to the specification, the main characteristics of BLE are:
- Ultra-low peak, average and idle mode power consumption
- Ability to run for years on standard coin-cell batteries
- low cost
- Multi-vendor interoperability
- Enhanced range
Bluetooth Low Energy (BLE).
A device that uses the BLE makes its presence known through an "advertising" mechanism.
As for the advertising and the connection to a central device, roles and actions are defined by the GAP (Generic Access Profile).
The GAP briefly defines how a BLE device can communicate broadcast to the rest of the world its presence, the services it offers and how you can establish a connection between the BLE device and a central device.
GAP defines two main roles:
- Peripheral: a low-power device, resource constrained, which transmits data via BLE;
- A Device Central, which collects data, for example from multiple devices.
The peripheral initially transmits in broadcast mode, by periodically sending an "advertising packet" that provides information on the device itself and can also carry data, if you want to transmit in broadcast mode, "connection-less."
The central device typically performs a scan of devices, capturing the "advertising packets", in order to identify devices with which to connect.
When the device is identified, the central device can establish a connection, thus enabling a bi-directional communication between the peripheral and the central device itself.
The specification defines a few simple rules:
- A device can be connected only to a single central device;
- Generally, after establishing a connection, the device ceases to send advertising packets.
The GAP defines an additional mechanism: a central device can send a BLE Scan Request to a device, to which the device responds with a Scan Response: it is a mechanism that allows an additional sending of descriptive information on the peripheral, required from Device Central.
After having implemented the connection, the communication is ruled by GATT mechanisms (Generic Attribute Profile).
GATT defines how should be the communication between two devices where a connection has been made. It defines how a client can identify the services offered by a server (discovery), how information offered can be read and write, and how receive notifications about state’s changes.
GATT defines two roles:
- Client Device; the device requesting the connection and performing Read and Write Request;
- Server Device: the device that responds to requests.
The communication between the two devices is governed by GATT Transactions’ mechanism.
The exchange of data takes place using logical data structures. It is based on the concepts of:
- Profile;
- Service;
- Characteristics.
Typically, a device defines (or supports) one or more profiles. A profile includes N services and each service provides M characteristics.
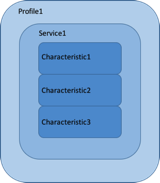
An example of profile.
The specification defines, to ensure the maximum possible interoperability between devices and device, a whole set of profiles.
An example of a profile is the Heart Rate Profile (HRP) that is the recommended profile, for example, for the heart rate monitors that use BLE. As indicated in the specification, this profile "enables a Collector Device to connect and interact with Cardio sensors for use in fitness applications."
The profile defines two services, as shown below:
- Heart Rate Service;
- Device Information Service.
 BLE and NodeJS.
If you have hardware that can communicate using BLE, you can quickly build applications that exchange information through BLE using the NodeJS platform and the programming language JavaScript.
As previously mentioned, in general (see GAP) BLE will provide for two distinct roles: in other words, our device can be a peripheral device or a central device.
NodeJS provides a modular extension mechanism, based on modules. There is a very broad set of modules, many OpenSource, which can be downloaded from the Internet and installed.
Modules supporting BLE are all "wrapper" of C libraries provided by the underlying hardware platform.
Two Open Source modules can be usefully employed to carry out experiments based on BLE:
- BLENO, which can be used to implement a Device; https://github.com/sandeepmistry/bleno
- NOBLE, to implement a central device; https://github.com/sandeepmistry/noble
Both modules can be installed using NPM.
As we will see below, the code that uses the two modules can be tested on a device like the Intel Edison board and a MacBook.
An experiment: the environment.
To get a better feeling of BLE and how to set up communication with devices based on this protocol we will use the following working environment:
- Intel Edison board, connected to the sensors, which will act as peripheral device;
- A PC that will act as a central device; in my case I used a MacBook Pro (I’m a proud Mac user for years now).
On Mac you can easily install tools that allow you to connect with BLE devices and to analyze and diagnose what is happening during the communication.
In our case we use Developer Tools (Bluetooth Explorer, etc) that are integrated into Xcode.
These tools must be pre-installed by downloading from the Apple website.
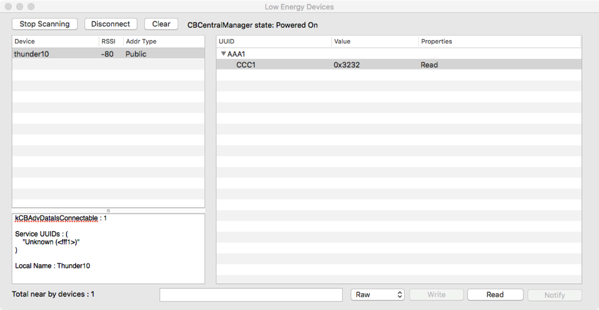
In the illustration below, the Bluetooth Explorer is shown, after he has discovered my Intel Edison with BLE activated and initiated a connection (the hostname is thunder10 card and exposes a service of UUID AAA1):
Bluetooth and Intel Edison.
In our experiments we will use as a Peripheral Device an Intel Edison board. It natively supports the BLE protocol and requires no additional hardware. Bluetooth management is implemented at hardware level by the chipset Broadcom BCM43340.
A very complete and updated guide on these subjects has been published by Intel and is available at the following URL:
http://www.intel.com/content/www/us/en/support/boards-and-kits/000005743.html
For further details regarding the use of Bluetooth BLE with Edison the reading of the guide is definitely to be recommended.
Intel Edison is a powerful card and probably its best use is in the role of central device, but being small size and with low-power consumption it can be also effectively used in the role of peripheral device.
The stack of Bluetooth protocol in Edison is implemented using BlueZ, the official "protocol stack" of Linux 1 . BlueZ is an OpenSource project.
For more details on BlueZ you can visit their site:
Intel in the article linked above lists all the commands available at O.S. level, to enable/disable BT and perform most common Bluetooth operations (e.g. scan of visible devices).
The main command-line utility is bluetoothctl.
For example, the following sequence of commands shows how you can make "discoverable" by a Smartphone an Intel Edison board, as seen from the output of the console (obtained through an SSH connection via WIFI to Edison board):
bluetoothctl
[NEW] Controller 58: A8: 39: 00: 18: 94 thunder10 [default]
[Bluetooth] # discoverable on
Changing discoverable on succeeded
[CHG] Controller 58: A8: 39: 00: 18: 94 Discoverable: yes
[NEW] Device F0: DB: F8: 8B: BE: 28 iPhone Louis
[CHG] Device F0: DB: F8: 8B: BE: 28 Connected: no
[DEL] Device F0: DB: F8: 8B: BE: 28 iPhone Louis
[NEW] Device F0: DB: F8: 8B: BE: 28 iPhone Louis
In the second part of the log you see the interaction with a Smartphone (iPhone) who made the discovery of the device and attempted to connect.
Sample code to implement a BLE device.
We are going to explore the JavaScript code, based on BLENO, to implement a simple BLE peripheral device.
The total HW is made by an Intel Edison board, with an Arduino Breakout Board kit. The board is equipped with a Grove Shield to which a Grove Temperature Sensor is connected.
First, to handle a bug in BLENO, tied to a conflict with the daemon bluetoothd, before executing the JavaScript code you must run the following sequence of commands:
# Command needed to solve problems with bluez on Linux
# To enable Bluetooth
rfkill unblock bluetooth
killall bluetoothd
hciconfig hci0 up
Now let's see together the key elements of Javascript code.
To manage in a simple manner sensors you can use the UPM library and UPM_GROVE module (JSUPM_GROVE).
In order to use the modules (BLENO, JSUPM_GROVE) and the temperature sensor:
// Using the bleno BLE module for communication
var bleno = require ( 'bleno');
// Using UPM for Grove Temp Sensor
var groveSensor = require ( 'jsupm_grove');
var tempSensor = new groveSensor.GroveTemp(0);
The sensor is connected to the pin A0.
The first operation the code must carry on is to start the Advertising process, with the periodic emission of the relevant packet, as soon as the BLE module is poweredOn
// When BLENO starts, begin the advertising
bleno.on ( 'stateChange', function (state)
{
console.log ( 'State change:' + state);
if (state === 'poweredOn')
{
// What I want to advertise
bleno.startAdvertising ( 'Thunder10', [ 'FFF1']);
isAdvertising = true;
} else
{
bleno.stopAdvertising ();
isAdvertising = false;
}
});
At this point the events that the JS code must manage are:
- ACCEPT of a connection;
- DISCONNECT, by the Central Device;
- STOP ADVERTISING of the process;
- START of the ADVERTISING process;
- READ request, by the Central Device.
ACCEPT:
// Accepted a connection from a central device
bleno.on ('accept', function (clientAddress)
{
console.log ( "Connection ACCEPTED from address:" + clientAddress);
// Stop advertising
bleno.stopAdvertising ();
isAdvertising = false;
console.log ( 'Stop advertising ...');
});
DISCONNECT:
// Disconnected from a client
bleno.on ('disconnect', function (clientAddress)
{
console.log ( "Disconnected from address:" + clientAddress);
// restart advertising ...
bleno.startAdvertising ();
isAdvertising = true;
console.log ( 'Start advertising ...');
});
In our case we decided to implement the rule that when a connection is established with a Device Central, our device (Edison) stops sending the Advertising Package (thus, it is no longer discoverable).
STOP ADVERTISING:
bleno.on ( 'advertisingStop', function (error)
{
console.log ( 'Advertising Stopped ...');
});
The most complex part of the code is the following:
bleno.on('advertisingStart', function(error)
{
if (error)
{
console.log("Advertising start error:" + error);
} else
{
console.log("Advertising start success");
bleno.setServices([
// Define a new service
new bleno.PrimaryService({
uuid : 'aaa1',
characteristics : [
// Define a new characteristic within that service
new bleno.Characteristic({
value : null,
uuid : 'ccc1',
// the value can ONLY be READ
properties : ['read'],
// Send a message back to the client with the
//characteristic's value
onReadRequest : function(offset, callback)
{
console.log("READ request received");
// read the temperature value from the sensor
this.value = tempSensor.value();
console.log('Temperature Value: ' + this.value);
callback(this.RESULT_SUCCESS, new Buffer(
(this.value ? this.value.toString() : "")));
}
})
]
})
]);
}
});
The choice made here, that is not the only one possible, is to define the service at the time of the start of advertising.
The code defines a service, identified by the UUID AAA1. Within this service you define a single characteristic, with UUID CCC 1. The feature has a value that can only be read (Read) and it is associated with the onReadRequest callback which is invoked by BLENO stack when it receives the READ request. The onReadRequest invokes the code to read the current value of temperature, which is returned by BLE.
In the code we only manage the events (1 to 5) listed above. In general, it should also provide for other events, such as: WRITE Request, Notify. But in our case the value exposed by the service (room temperature) can only be read and we assume that you do not want to provide notification of value changes, from the device to the Device Central.
Each event is run by a suitable callback, as usual in NodeJS.
Using the NOBLE module for the implementation of a BLE Central Device.
Another module that can be used to implement in NodeJS the other side of the connection (the Central Device) is Noble.
I have personally tested Noble on my MacBook, but it also runs on Intel Edison (which can then act as Device Central, as aggregator node).
If you install Noble, in the directory
node_modules / examples
There are three useful sample programs that show how to use the module API:
- enter_exit.js, who simply writes a line each time a visible BLE device connects or disconnects;
- advertisement_discovery.js, performing a scan of the visible devices and displays the list of advertised services.
- Finally peripheral_explorer, to be launched with the <device address> parameter, which shows the services and features exposed by the specified device address.
Finally, a last module that can be used to implement a Beacon is:
Node-bleacon
Some final thoughts.
Writing JavaScript code based on the two mentioned modules is not complex and, starting from the examples, with adequate experience, it is possible to create in a short time applications.
However, in tests carried out by me not always everything worked. In some cases I had to reboot the Edison board to resume the tests correctly, which shows that the two modules and the underlying stack have not, yet, totally free of bugs.
Moreover, the daily experience with the Bluetooth protocol, by users, showed us situations where, for example, the coupling between the two devices is not successful end and attempts must be repeated.
Suggestions for further reading.
A collection of short but very clear and useful pages on BLE is available on the Adafruit website:
https://learn.adafruit.com/introduction-to-bluetooth-low-energy
To learn more about using the iBeacon technology a very useful site is Apple site:
https://developer.apple.com/ibeacon/
Wednesday, July 20, 2016
IBM Bluemix, IoT and Coursera
Mooc from companies like Coursera are a great way for improving your knowledge and acquire new skills and competencies.
I have recently completed this course on IBM IoT Cloud platform
https://www.coursera.org/learn/developer-iot
I have found really interesting:
- The rising importance of JavaScript and NodeJS for IoT development
- How is easy to develop Gateways and Cloud based applications for real-time handling of telemetry data, using Visual Language NodeRED (based on NodeJS)
- How IBM Bluemix works
- The central role played by MQTT (well, it was invented by IBM)
If you need more insight into IBM Bluemix IoT and in general IoT Cloud platforms, I would recommend this course. Worth spending some euro to get a Verified Certificate.
Monday, June 27, 2016
What languages for IoT?
Ian Skerrett, from Eclipse Foundation, has written a nice blog post about
https://ianskerrett.wordpress.com/2016/04/14/profile-of-an-iot-developer-results-of-the-iot-developer-survey/
- What are the most used languages?
- The most adopted Cloud Providers?
- ..
https://ianskerrett.wordpress.com/2016/04/14/profile-of-an-iot-developer-results-of-the-iot-developer-survey/
Node-Red and IBM Bluemix
I’m progressing, in the free time, my evaluation of Cloud IoT platforms.
As I wrote in a previous blog post, IBM IoT platform is really interesting. One of her strong point is NodeRED, a Visual Programming Language for IoT and Integration, built on top of NodeJS.
I have upgraded my Raspbian Jessie image on my RPI. With the upgrade I have found a new version of NodeRED.
Inside I have discovered, already installed, nodes to communicate with IBM IoT Watson. Nice.

Monday, June 13, 2016
NodeJS and IoT: Node Red
Next thing I'm going to explore is Node-Red.
Node-Red is a Visual Language, developed by IBM Emerging Technologies, that can be used to rapidly develop integration flows for IoT Application.
It is based on JavaScript and NodeJS.
It is available as part of IBM Bluemix PaaS, but since it is OpenSource you can install it on any environment where NodeJS is available. For example you can install it on a Raspberry PI or on a Intel Edison Board.
I have already written a short post on the subject:
http://lsaetta.blogspot.it/2016/04/visual-integration-tools.html
Stay tuned for updates on the subject!
Saturday, May 7, 2016
Now with real sensors
The hardware configuration I’m going to test consist of an Edison Board equipped with a Grove Shield to which we have connected three sensors (for now Air Quality Sensor is not used):
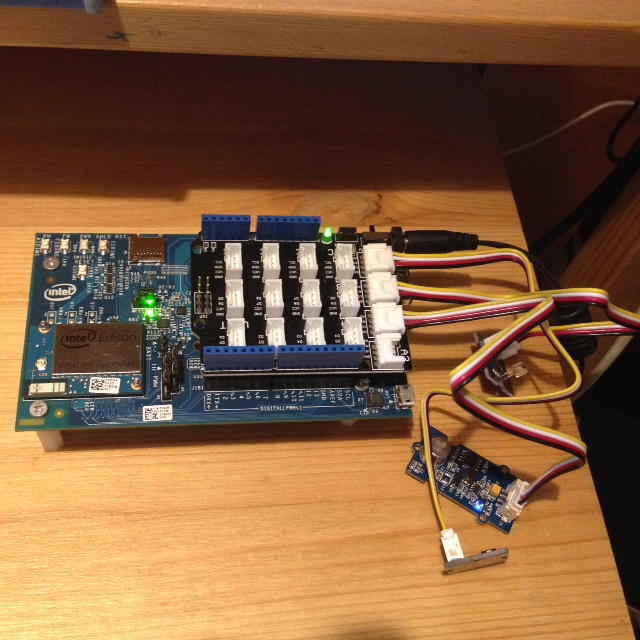
With the following code, we read values from sensors and send every 2 secs. (in the config) a msg to AWS IoT, containing value read for temperature (C) and light (lux).
Configuration is read from a file (config.js), whose content is:
{
The last piece (config.js) shows you what must be considered a best practice: Keep separated the logic from the configuration, that probably needs to be different from device to device and maybe can change more frequently. This way you need only to replace the config.js file.
The nice thing with Edison is that, if you want to change the configuration, you can simply upload the config.js file Over The Air.
- Temperature sensor, to A0
- Light sensor, to A1
With the following code, we read values from sensors and send every 2 secs. (in the config) a msg to AWS IoT, containing value read for temperature (C) and light (lux).
Configuration is read from a file (config.js), whose content is:
{
"keyPath" : "/node_app_slot/certs/thunder10-private.pem.key",}
"certPath" : "/node_app_slot/certs/thunder10-certificate.pem.crt",
"caPath" : "/node_app_slot/certs/root-ca.crt",
"region" : "eu-west-1",
"clientId" : "thunder10",
"sleepTime" : 2000
The last piece (config.js) shows you what must be considered a best practice: Keep separated the logic from the configuration, that probably needs to be different from device to device and maybe can change more frequently. This way you need only to replace the config.js file.
The nice thing with Edison is that, if you want to change the configuration, you can simply upload the config.js file Over The Air.
Thursday, May 5, 2016
Edison talk to AWS: Hello
In this post I’d like to explore, with some details, how to connect an Intel Edison Board to Amazon AWS.
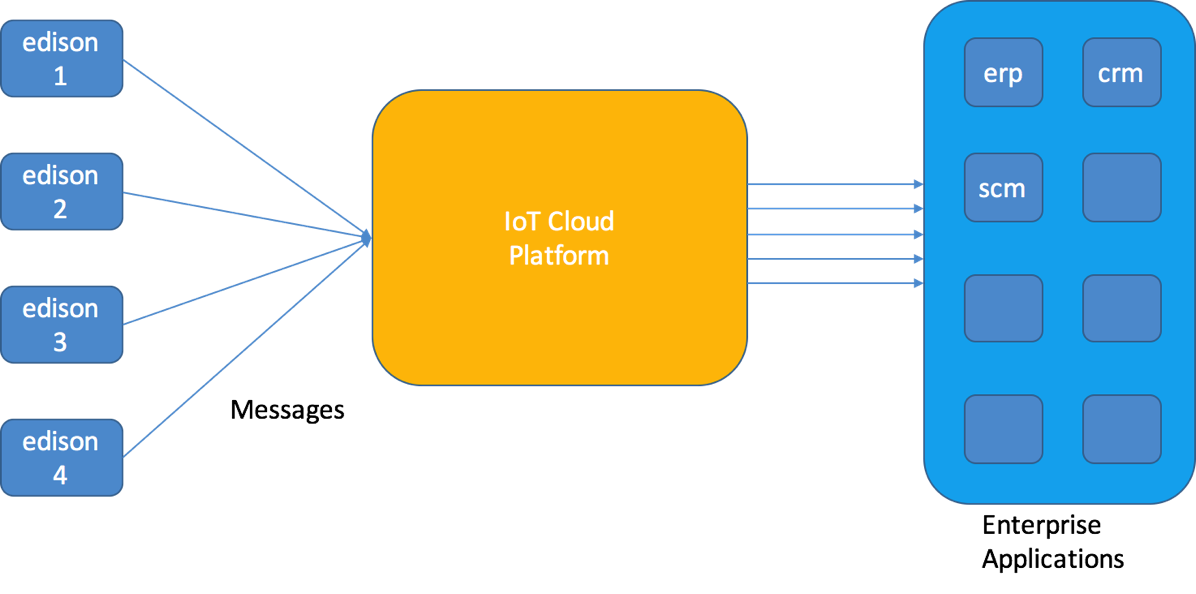
This is the architecture we’re going to test:
The development language that I will use is JavaScript, running in NodeJS.
First, you need to have a working subscription with Amazon AWS, and you need to have provisioned AWS IoT.
Then, using AWS Console, you need to create a Thing.
I have called this thing Thunder10.
Then, you need to connect to this thing a Device. When you do this operation, you can select an SDK.
We will select NodeJS JDK.
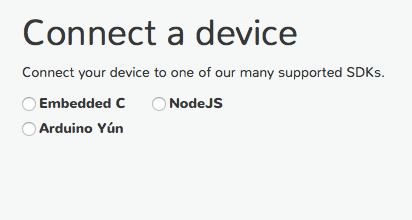
Then, you generate a certificate and a policy, that is attached to the thing. In this way you will create the public/private key-pair that will be used by the SDK to secure the communication.
Since it is attached to the thing, it will also ensure that your thing is recognized.
Then, you download the public/private key and the certificate. Take care that this is a one-time operation. In other words, after this step, if you don’t save the public and private key you won’t be able to retrieve them another time.
You will need to upload these files on the Edison board, in a well defined directory (you choose which one).
I have decided for /node_app_slot/certs
Then, after downloaded the keys and the certificate, you arrive to this page:
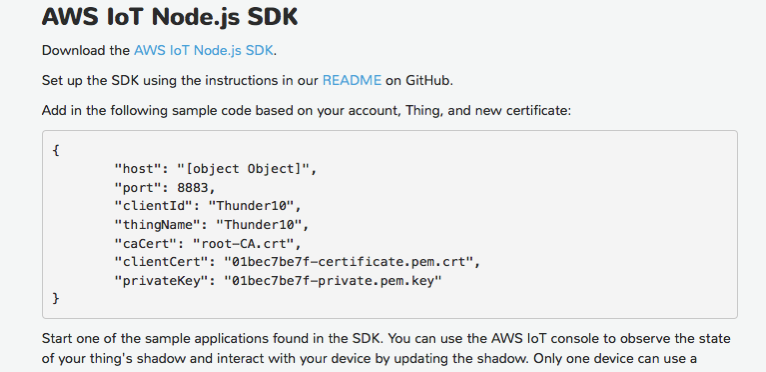
In the page you find the information needed to setup the connection between the thing and Amazon AWS. Then you can download the SDK.
You can download the root CA certificate from here:
The SDK is based on MQTT.js. You can also install the SDK using npm. You find all the detailed instructions on the github.
To install it,
Now, the important question is: how can I verify that my Edison (called Thunder10, has connected to AWS IoT and has successfully sent a msg.
There is a simple way:
Go to the console and use the MQTT client (yes !!!, the device is using MQTT, what else?)

Create a client, specify a clientId and then, subscribe to the same topic you have defined in the publish invocation in the code (thunder10/test)
If everything is ok, you will see a msg on the left.
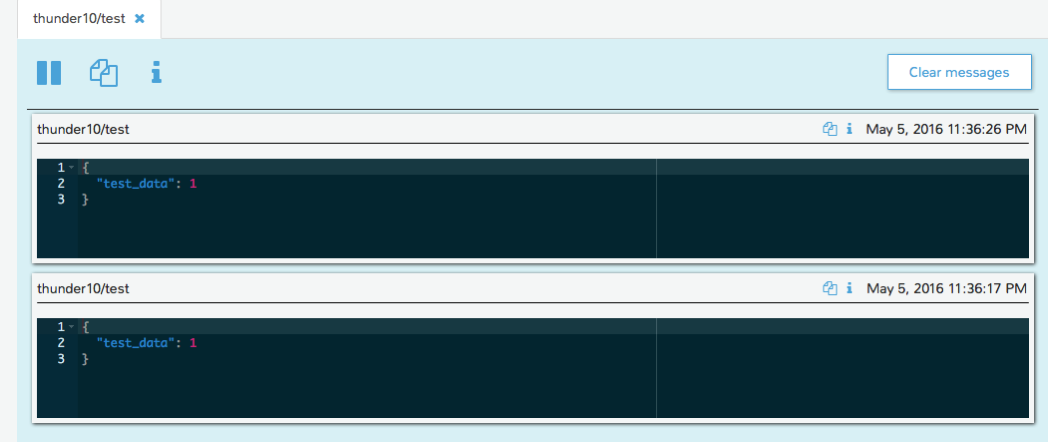
One more thing. If you want to send messages in a loop, the code becomes
In the next post, maybe I’ll explore how to set-up a rule and invoke a Lambda function.
Another idea is to verify how it works on Azure.
Good Night baby.
This is the architecture we’re going to test:
The development language that I will use is JavaScript, running in NodeJS.
First, you need to have a working subscription with Amazon AWS, and you need to have provisioned AWS IoT.
Then, using AWS Console, you need to create a Thing.
I have called this thing Thunder10.
Then, you need to connect to this thing a Device. When you do this operation, you can select an SDK.
We will select NodeJS JDK.
Then, you generate a certificate and a policy, that is attached to the thing. In this way you will create the public/private key-pair that will be used by the SDK to secure the communication.
Since it is attached to the thing, it will also ensure that your thing is recognized.
Then, you download the public/private key and the certificate. Take care that this is a one-time operation. In other words, after this step, if you don’t save the public and private key you won’t be able to retrieve them another time.
You will need to upload these files on the Edison board, in a well defined directory (you choose which one).
I have decided for /node_app_slot/certs
Then, after downloaded the keys and the certificate, you arrive to this page:
In the page you find the information needed to setup the connection between the thing and Amazon AWS. Then you can download the SDK.
You can download the root CA certificate from here:
The SDK is based on MQTT.js. You can also install the SDK using npm. You find all the detailed instructions on the github.
npm install aws-iot-device-sdkAfter having installed the SDK and having uploaded keys and certificate to the directory chosen, you can quickly test a connection and send a ms with the following NodeJS code
var awsIot = require('aws-iot-device-sdk');take care that the program will stay on and connected waiting for… a CTRL-C.
console.log('Started Test with AWS !!!');
var device = awsIot.device({
keyPath: "/node_app_slot/certs/thunder10-private.pem.key",
certPath: "/node_app_slot/certs/thunder10-certificate.pem.crt",
caPath: "/node_app_slot/certs/root-ca.crt",
clientId: "thunder10",
region: "eu-west-1"
});
device
.on('connect', function() {
console.log('connect');
});
device.publish('thunder10/test', JSON.stringify({ test_data: 1}));
Now, the important question is: how can I verify that my Edison (called Thunder10, has connected to AWS IoT and has successfully sent a msg.
There is a simple way:
Go to the console and use the MQTT client (yes !!!, the device is using MQTT, what else?)
Create a client, specify a clientId and then, subscribe to the same topic you have defined in the publish invocation in the code (thunder10/test)
If everything is ok, you will see a msg on the left.
One more thing. If you want to send messages in a loop, the code becomes
var awsIot = require('aws-iot-device-sdk');It is easy. In more or less 1.5 hours.
var connected = false;
console.log('Started Test with AWS !!!');
var device = awsIot.device({
keyPath: "/node_app_slot/certs/thunder10-private.pem.key",
certPath: "/node_app_slot/certs/thunder10-certificate.pem.crt",
caPath: "/node_app_slot/certs/root-ca.crt",
clientId: "thunder10",
region: "eu-west-1"
});
device
.on('connect', function() {
console.log('connect');
connected = true;
});
function doSomething()
{
if (connected)
{
device.publish('thunder10/test', JSON.stringify({ temp: 25}));
console.log('Sent...');
}
// re-schedule executionn of publish
setTimeout(doSomething, 5000);
}
doSomething();
In the next post, maybe I’ll explore how to set-up a rule and invoke a Lambda function.
Another idea is to verify how it works on Azure.
Good Night baby.
Saturday, April 30, 2016
Set-up a NodeJS environment on Intel Edison: all-the-pieces
Working with NodeJS is fun and effective, but… 
Note: this is rather a long post !!!
Coding in JavaScript is easy, and you have many modules that you can use.
For example, I have soon discovered that there is a module for MQTT. With this module you can easily publish MQTT messages to topics and subscribe.
You have also two good libraries, allowing you from a NodeJS program to interface with HW and to read from sensors: MRAA and UPM.
But to work in NodeJS on Intel Edison is NOT always easy and fun.
What is the main reason? Well I think it all points to the fact that the Linux distribution (well, it is not actually a distribution) is Yocto.
The NodeJS version shipped with Intel Edison, even if you download the latest available version (very. 3) is 0.10
This is an old version, with many important bugs.
For example, I have discovered soon that using MQTT if you send frequently messages from the board to the MQTT broker (let’s say every 10 sec.) very soon the programs stops working after 10 min.
Some test have showed me that the problem can be solved upgrading Node. It is ok with 0.12 version.
But the upgrade of the Node environment is not easy.
When I talk about environment I mean:
- NodeJS version
- The XDK agent (to be able to upload new Node programs directly from Intel XDK to the board, and launch them from the XDK)
- MRAA with Node bindings (add-ons)
- UPM with Node Bindings
Actually, now there is not a simple way, and it take a lot of manual work. And as I see, there is not a single, clear document describing how to do it.
In this blog post, I want to document the steps I have undertaken to upgrade NodeJS on Edison Board with an environment fully working.
High level steps:
- Flash the board with the latest Yocto version
- Configure Edison
- Upgrade MRAA and UPM libraries
- Upgrade the XDK agent
- Download and build the NodeJS (4.2)
- Set-up MRAA
- Set-up UPM
- Install MQTT
- Test all together
Doing it for the first time requires half a day !
Flash the board with latest Yocto version.
The only way that always works for me is to use the flashall.sh script, from the command line.
Sometimes, I need to reboot my MAC, before to start the flashing procedure. This is needed to avoid that the flashing procedure timeout while waiting for the FTDI device to re-appear.
You download and unzip the distribution (Yocto Release 3.0), taken from here,
https://downloadmirror.intel.com/25871/eng/iot-devkit-prof-dev-image-edison-20160315.zip
then launch from the command line flashily.sh and connect through USB cables when requested.
It should take about 10 min
Configure Edison
At this point, you need to have the Intel XDK installed on your MAC or Laptop.
Launch the XDK and connect to the Edison using the serial connection (you have still the board connected with the two cables).
From the command line interface, launch
configure_edison —password
configure_edison —name
configure_edison —wifi
to setup a password, the hostname and to connect to the WI-FI network.
Upgrade MRAA and UPM libraries
From XDK, launch, upgrade libraries.
After, you can verify with opkg info
opkg info mraa
Package: mraa
Version: 1.0.0
Provides: mraa-dev, mraa-dbg, mraa-doc
Replaces: mraa-dev, mraa-dbg, mraa-doc, libmraa, libmraa-dev, libmraa-doc
Conflicts: mraa-dev, mraa-dbg, mraa-doc
Status: install user installed
Architecture: i586
Installed-Time: 1462025597
opkg info upm
Package: upm
Version: 0.6.2
Depends: mraa (>= 0.9.1)
Provides: upm-dev, upm-dbg, upm-doc
Replaces: upm-dev, upm-dbg, upm-doc
Conflicts: upm-dev, upm-dbg, upm-doc
Status: install user installed
Architecture: i586
Installed-Time: 1462025678
Upgrade the XDK agent
Again, from the XDK IDE (see preceding image).
Download and build the NodeJS (4.2)
First of all, remember that the space is limited. Therefore, you need to download the NodeJS distribution and start the build in a directory where you have enough space.
I have decided to create a downloads directory under /home/root
There, you can put the tree obtained from the tarball, downloaded from the NodeJS site.
But, I have hit one (of the many) annoying problem: if you simply download (with wget) the tar.gz file and explode it with tar xvf, when you launch configure on Edison you get a very strange error: the configure script (that is a Python script) complains that it cannot find the nodedownload module.
Well, I have found that the problem is in the tar utility, that doesn’t extract all the files (strange, but this is the reason). Actually, when I have unzipped the tar.gz file on my MAC I have found that the file nodedownload.py is there.
Solution: unpack the tarball file on your MAC, and upload all the resulting tree of directories and files on the Edison.
It will take some time, but I have no idea of a better solution.
then, update the XDK agent, from the XDK
The link where I took the tarball is:
http://nodejs.org/dist/v4.2.0/node-v4.2.0.tar.gz
Then, go inside the node-v4.2.0 directory and execute
./configure
make
It will take about three hours !
make install
Then, you have
root@thunder10:/# /usr/local/bin/node -v
v4.2.0
Update the XDK agent
Then, update the XDK agent, from the XDK IDE.
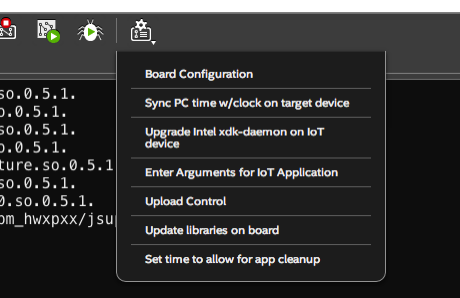
after, you should be able to upload a NodeJS application directly from XDK, connected to the board through WIFI, to the directory /node_app_list on the Edison board.
Setup mraa
Then, in the directory /node_app_list run
npm install mraa
After this, mraa is correctly linked to Node. In fact, the following blink code works
var mraa = require('mraa'); //require mraa
console.log('MRAA Version: ' + mraa.getVersion()); //write the mraa version to the Intel XDK consolevar myOnboardLed = new mraa.Gpio(13); //LED hooked up to digital pin 13
myOnboardLed.dir(mraa.DIR_OUT); //set the gpio direction to output
var ledState = true; //Boolean to hold the state of LedperiodicActivity(); //call the periodicActivity function
function periodicActivity()
{
myOnboardLed.write(ledState?1:0);
ledState = !ledState; //invert the ledState
setTimeout(periodicActivity,200);
}
Setup of UPM.
Under /home/root/downloads clone upm git repository
git clone https://github.com/intel-iot-devkit/upm.git
cd upm
mkdir build
cd build
cmake .. -DCMAKE_INSTALL_PREFIX:PATH=/usr
After, to compile only upm_grove (and produce the right jsupm_grove module)
cd src/grove
make
make install
To test, I have used the Grove Light sensor, attached to A1. This is the code I have used to test:
var groveSensor = require('jsupm_grove');
// Create the light sensor object using AIO pin 0
var light = new groveSensor.GroveLight(1);// Read the input and print both the raw value and a rough lux value,
// waiting one second between readings
function readLightSensorValue() {
console.log(light.name() + " raw value is " + light.raw_value() +
", which is roughly " + light.value() + " lux");
}
setInterval(readLightSensorValue, 1000);
and this is the output from the program:
Light Sensor raw value is 184, which is roughly 2 lux
Light Sensor raw value is 190, which is roughly 2 lux
Light Sensor raw value is 357, which is roughly 5 lux
Light Sensor raw value is 361, which is roughly 5 lux
It works fine under Node 4.2 !!!
Setup MQTT
Under /node_app_slot execute
npm install mqtt
and this is the code of the program that I have used to test that UPM and MQTT work under NodeJS 4.2
var mqtt = require('mqtt');
var groveSensor = require('jsupm_grove');
var MSG_TOPIC_NAME = 'sensors/SN3/msg';
var CONTROL_TOPIC_NAME = 'sensors/control/SN3';var SENSOR_ID = 'SN3';
var BROKER_URL = 'mqtt://broker_host';
var SLEEP_TIME = 3000; // 3 seconds
var PIN_TEMP = 0;// Create the temperature sensor object using AIO pin 0
var temp = new groveSensor.GroveTemp(PIN_TEMP);
// connect to the Broker
var mqtt_client = mqtt.connect(BROKER_URL, {'keepalive' : 60});//
// define events and callback
//
mqtt_client.on('close', handle_mqtt_close);
mqtt_client.on('connect', handle_mqtt_connect);
mqtt_client.on('reconnect', handle_mqtt_reconnect);
mqtt_client.on('error', handle_mqtt_err);
mqtt_client.on('message', handle_messsage);// the variable that will contain the object for the MQTT msg
// This is the format of the msg: {"id":"SN3","temp":"26"}
//
var msg = {};
var count = 0;function handle_mqtt_connect()
{
console.log("MQTT Connect...");mqtt_client.subscribe('CONTROL_TOPIC_NAME', handle_mqtt_subscribe);
}function handle_mqtt_subscribe(err, granted)
{
console.log("MQTT Subscribe...");
if (err)
{
console.log(err);
}
}function handle_mqtt_reconnect(err)
{
console.log("MQTT Reconnect...");if (err)
{
console.log(err);
}
mqtt_client.subscribe('CONTROL_TOPIC_NAME', handle_mqtt_subscribe);
}function handle_mqtt_err(err)
{
console.log("MQTT Error...");
if (err)
{
console.log(err);
}
}function handle_mqtt_close()
{
console.log("MQTT Close...");
}function after_publish()
{
// for now nothing...
}function handle_messsage(topic, message, packet)
{
console.log('Message received!');
console.log('msg = ' + message.toString());
}function readSensors()
{
count = count + 1;
console.log('***********************');
console.log("Iteration n. %d", count);
var rounded_temp = temp.value();
// build the object message
// that will be sent as a JSON message
msg.id = SENSOR_ID;
msg.temp = rounded_temp.toString();
// send with MQTT QOS = 1
if (rounded_temp)
mqtt_client.publish(MSG_TOPIC_NAME, JSON.stringify(msg), {'qos' : 1}, after_publish);setTimeout(readSensors, SLEEP_TIME);
}readSensors();
MQTT messages are sent to a Mosquitto broker installed on a Raspberry PI 2, connected to the WIFI network.
To verify that messages are correctly sent and received from the Broker, I have used the Eclipse Paho GUI Client:

Friday, April 29, 2016
NodeJS and Intel Edison... back to work
I have found some time to dedicate to the issues I have found using NodeJS on Intel Edison.
As I wrote some posts ago, the version shipped with Edison is Node 0.10, that is not really stable.
For example, using MQTT, a simple programs that reads from several sensors and send msgs to a MQTT Topic, hosted on RPI, stops working after about 10 minutes (it depends on the frequency of sends).
I have tried to upgrade to at least Node version 0.12.7. But the upgrade of the entire environment is not easy.
I asked on Intel Communities, and this is the answer from an Intel guy:
"Hello LSaetta,
As you mentioned, mraa and upm are not compatible with the later versions of Node.JS. There are methods to make mraa work with newer versions of node, however they don't work at 100%. So, my best suggestion is that you submit an issue to the mraa and upm developers in https://github.com/intel-iot-devkit/mraa or https://github.com/intel-iot-devkit/upm".
Manually you can do the upgrade, finding a combination that works, but it is really NOT easy.
I'll post an issue and ... hope Intel wants to really improve support of NodeJS.
Tuesday, April 12, 2016
Amazon AWS IoT
Yes, you need to be well aware of the features and the way to work with the most used Cloud IoT platforms.
Yesterday evening I had some spare time (well, sort of) and I decided to give a try to Amazon AWS IoT.
I have developed a quick example, written in NodeJS, that sends MQTT msgs from my IoT gateway (based on RPI2) to Amazon IoT.
Documentation is not perfectly clear, but the example has worked. Maybe I'll write a longer post trying to clarify all the steps needed.
Yesterday evening I had some spare time (well, sort of) and I decided to give a try to Amazon AWS IoT.
I have developed a quick example, written in NodeJS, that sends MQTT msgs from my IoT gateway (based on RPI2) to Amazon IoT.
Documentation is not perfectly clear, but the example has worked. Maybe I'll write a longer post trying to clarify all the steps needed.
Saturday, April 9, 2016
Visual Integration Tools
On my IoT Gateway two components have a great importance:
Node-Red is a great integration tool, based on NodeJS, but with a Visual Designer.
For example, with this simple flow, I take a msg from a MQTT Topic, I do some simple transformations and then I store the readings from sensors in a MySQL table.
Cool

- NodeJS
- Node-Red
Node-Red is a great integration tool, based on NodeJS, but with a Visual Designer.
For example, with this simple flow, I take a msg from a MQTT Topic, I do some simple transformations and then I store the readings from sensors in a MySQL table.
Subscribe to:
Posts (Atom)