Showing posts with label AWS. Show all posts

Monday, July 3, 2017

AWS IoT: a collection of my posts


I have collected in this post a set of my previous posts on AWS IoT

How to quickly connect a field gateway, based on MQTT, and Amazon AWS IoT


What Programming Languages are most used for IoT (and Cloud)?


AWS, Intel Edison and real sensors


Amazon AWS IoT, update


Edison talks to AWS


Comparison between Amazon AWS IoT and Microsoft Azure IoT


Thursday, September 8, 2016

Field gateway and AWS IoT Cloud

Very often devices are resource constrained.
For example, if you’re building a prototype using a (compatible) Arduino Uno, you have only few 100-kbs of memory to write your sketch.

This means that not always your devices are capable of supporting TLS and establishing a direct connection to an IoT Cloud Service.

In other cases, you don’t want a direct connection, for example for security reasons.

In this case, the recommended topology is based on the adoption of a “Field Gateway”. Your devices are directly connected to the gateway, they send messages to the gateway and the gateway forward these messages to the IoT Cloud Service.

If you’re using (and this is a good and one of the most commonly used approach) MQTT, then you can install a local MQTT broker on the gateway and use the “Bridge functionality” to relay messages from the local broker to the MQTT broker provided by the IoT Cloud Service.

If you plan to make use of Amazon AWS IoT Cloud, here you can find a well-made guide to configure the bridge. The local broker is Eclipse Mosquito.

Monday, June 27, 2016

What languages for IoT?

Ian Skerrett, from Eclipse Foundation, has written a nice blog post about
  • What are the most used languages?
  • The most adopted Cloud Providers?
  • ..
for Iot

https://ianskerrett.wordpress.com/2016/04/14/profile-of-an-iot-developer-results-of-the-iot-developer-survey/

Saturday, May 7, 2016

Now with real sensors

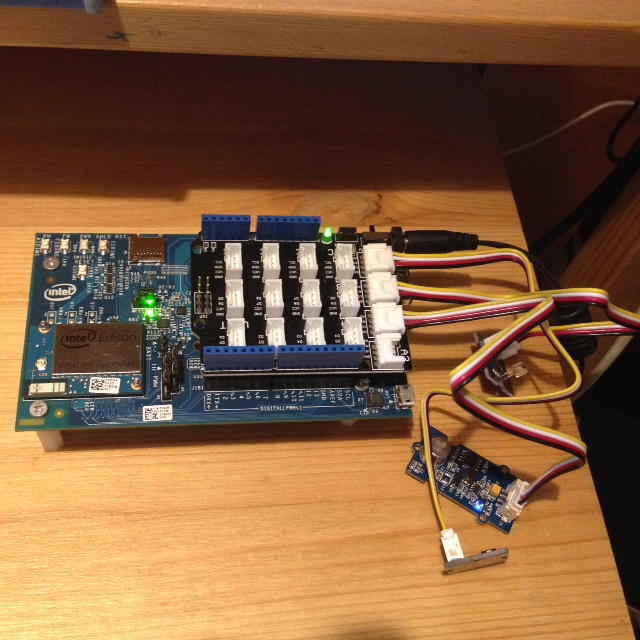
The hardware configuration I’m going to test consist of an Edison Board equipped with a Grove Shield to which we have connected three sensors (for now Air Quality Sensor is not used):
  • Temperature sensor, to A0
  • Light sensor, to A1
To handle reading from sensors, we will use UPM library. As we will see the Node code is simple.

IMG 0145
With the following code, we read values from sensors and send every 2 secs. (in the config) a msg to AWS IoT, containing value read for temperature (C) and light (lux).

Configuration is read from a file (config.js), whose content is:

{
"keyPath" : "/node_app_slot/certs/thunder10-private.pem.key",
"certPath" : "/node_app_slot/certs/thunder10-certificate.pem.crt",
"caPath" : "/node_app_slot/certs/root-ca.crt",
"region" : "eu-west-1",
"clientId" : "thunder10",
"sleepTime" : 2000
 }

The last piece (config.js) shows you what must be considered a best practice: Keep separated the logic from the configuration, that probably needs to be different from device to device and maybe can change more frequently. This way you need only to replace the config.js file.

The nice thing with Edison is that, if you want to change the configuration, you can simply upload the config.js file Over The Air.

Friday, May 6, 2016

Amazon AWS IoT: quick update

Since one of the communication protocol supported is MQTT, the obvious question is: can I use directly a MQTT client (in addition to the AWS SDK that we have used in the last post)?

Yes, you can.

For example, if you have some familiarity with MQTT, you probably have installed and worked with Mosquitto.

With Mosquitto you get installed two utilities that can be used to test publish and subscribe:

  • mosquitto_pub
  • mosquitto_sub

To test the transmission of a MQTT messages to your IoT gateway in AWS you need, as always, the certificate and the private key generated when you have registered your thing (the abstract representation in AWS of your device).

To publish a message:

/usr/local/bin/mosquitto_pub --cafile ./rootCA.pem --cert ./thunder10-certificate.pem.crt --key ./thunder10-private.pem.key -p 8883 -q 1 -d -t thunder10/test -m "Hello" -h A1NQFCHBXLAAH3.iot.eu-west-1.amazonaws.com

Client mosqpub/29492-MacBook-P sending CONNECT

Client mosqpub/29492-MacBook-P received CONNACK

Client mosqpub/29492-MacBook-P sending PUBLISH (d0, q1, r0, m1, 'thunder10/test', ... (5 bytes))

Client mosqpub/29492-MacBook-P received PUBACK (Mid: 1)

Client mosqpub/29492-MacBook-P sending DISCONNECT


The value you pass in the parameter -h is the hostname you have to refer to. You find it in your AWS IoT console.

-m: the value of the message (any sequence of bytes).

-p is the port

-q for the QoS; 1 means “at least once”. AWS doesn’t support “only once”.


You can easily run also a subscriber (mosquito_sub) on the same topic (in the example thunder10/test) and receive on your board (or laptop) the msg sent.


/usr/local/bin/mosquitto_sub --cafile ./rootCA.pem --cert ./thunder10-certificate.pem.crt --key ./thunder10-private.pem.key -p 8883 -d -t thunder10/test -h A1NQFCHBXLAAH3.iot.eu-west-1.amazonaws.com


Client mosqsub/29874-MacBook-P sending CONNECT


Client mosqsub/29874-MacBook-P received CONNACK


Client mosqsub/29874-MacBook-P sending SUBSCRIBE (Mid: 1, Topic: thunder10/test, QoS: 0)


Client mosqsub/29874-MacBook-P received SUBACK


Subscribed (mid: 1): 0


Client mosqsub/29874-MacBook-P received PUBLISH (d0, q0, r0, m0, 'thunder10/test', ... (5 bytes))


Hello


Client mosqsub/29874-MacBook-P received PUBLISH (d0, q0, r0, m0, 'thunder10/test', ... (5 bytes))


Hello


Thursday, May 5, 2016

Edison talk to AWS: Hello

In this post I’d like to explore, with some details, how to connect an Intel Edison Board to Amazon AWS.
This is the architecture we’re going to test:
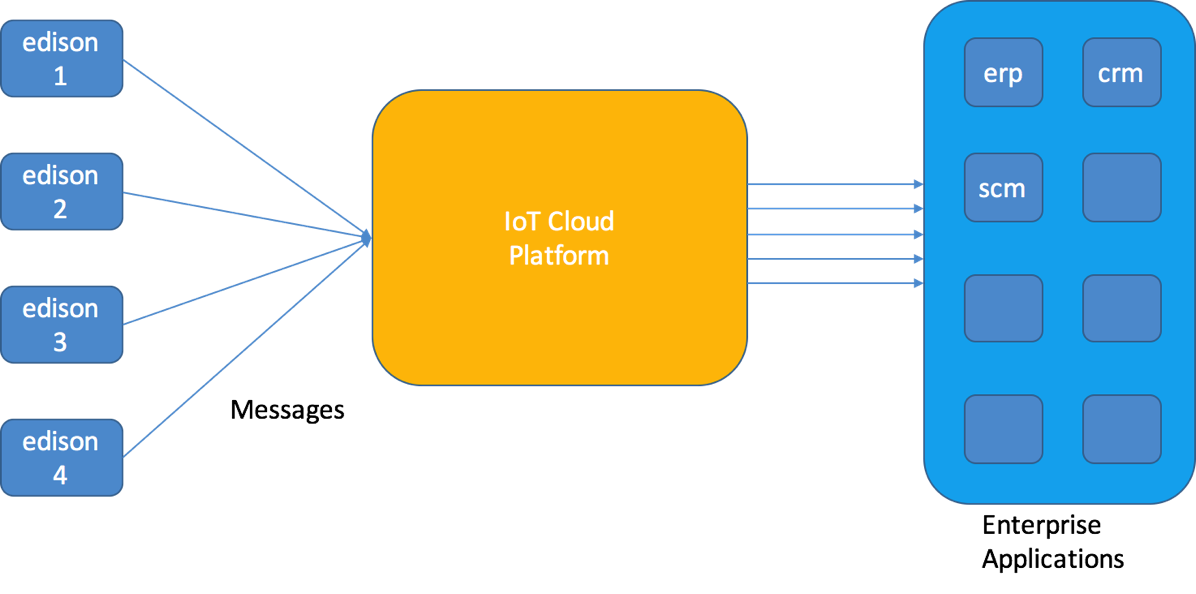
NewImage


 The development language that I will use is JavaScript, running in NodeJS.
First, you need to have a working subscription with Amazon AWS, and you need to have provisioned AWS IoT.
Then, using AWS Console, you need to create a Thing.
I have called this thing Thunder10.
Then, you need to connect to this thing a Device. When you do this operation, you can select an SDK.
We will select NodeJS JDK.
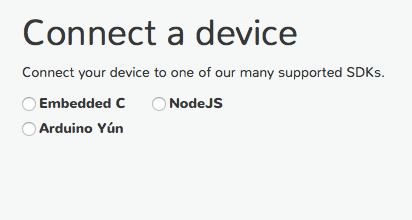
NewImage
Then, you generate a certificate and a policy, that is attached to the thing. In this way you will create the public/private key-pair that will be used by the SDK to secure the communication.
Since it is attached to the thing, it will also ensure that your thing is recognized.
Then, you download the public/private key and the certificate. Take care that this is a one-time operation. In other words, after this step, if you don’t save the public and private key you won’t be able to retrieve them another time.
You will need to upload these files on the Edison board, in a well defined directory (you choose which one).
I have decided for /node_app_slot/certs
Then, after downloaded the keys and the certificate, you arrive to this page:
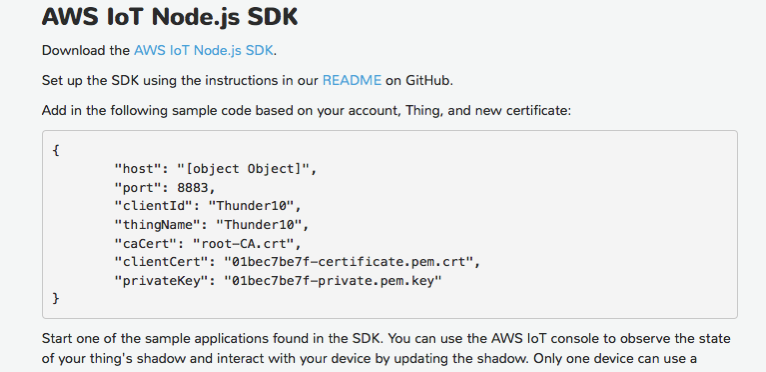
NewImage
In the page you find the information needed to setup the connection between the thing and Amazon AWS. Then you can download the SDK.
You can download the root CA certificate from here:
The SDK is based on MQTT.js. You can also install the SDK using npm. You find all the detailed instructions on the github.

To install it,
npm install aws-iot-device-sdk
After having installed the SDK and having uploaded keys and certificate to the directory chosen, you can quickly test a connection and send a ms with the following NodeJS code
var awsIot = require('aws-iot-device-sdk');
console.log('Started Test with AWS !!!');
var device = awsIot.device({
keyPath: "/node_app_slot/certs/thunder10-private.pem.key",
certPath: "/node_app_slot/certs/thunder10-certificate.pem.crt",
caPath: "/node_app_slot/certs/root-ca.crt",
clientId: "thunder10",
region: "eu-west-1"
});
device
.on('connect', function() {
console.log('connect');

});
device.publish('thunder10/test', JSON.stringify({ test_data: 1}));
take care that the program will stay on and connected waiting for… a CTRL-C.
Now, the important question is: how can I verify that my Edison (called Thunder10, has connected to AWS IoT and has successfully sent a msg.
There is a simple way:
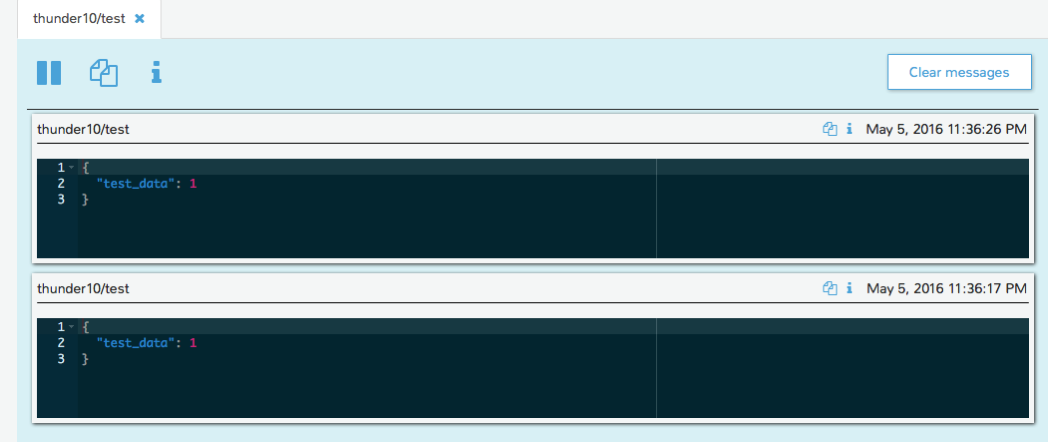
Go to the console and use the MQTT client (yes !!!, the device is using MQTT, what else?)
NewImage

Create a client, specify a clientId and then, subscribe to the same topic you have defined in the publish invocation in the code (thunder10/test)
If everything is ok, you will see a msg on the left.
NewImage

One more thing. If you want to send messages in a loop, the code becomes
var awsIot = require('aws-iot-device-sdk');
var connected = false;
console.log('Started Test with AWS !!!');
var device = awsIot.device({
keyPath: "/node_app_slot/certs/thunder10-private.pem.key",
certPath: "/node_app_slot/certs/thunder10-certificate.pem.crt",
caPath: "/node_app_slot/certs/root-ca.crt",
clientId: "thunder10",
region: "eu-west-1"
});
device
.on('connect', function() {
console.log('connect');

connected = true;

});
function doSomething()
{
if (connected)
{
device.publish('thunder10/test', JSON.stringify({ temp: 25}));
console.log('Sent...');
}
// re-schedule executionn of publish
setTimeout(doSomething, 5000);
}
doSomething();
It is easy. In more or less 1.5 hours.
In the next post, maybe I’ll explore how to set-up a rule and invoke a Lambda function.
Another idea is to verify how it works on Azure.
Good Night baby.